Sunday 31 March 2013

Dirty Weekend

My creativity seems to be full on at the moment. Sock making has taken a back seat for the moment in favour of a crochet scarf/ wrap. I also have two magazine articles in progress - one a mini book, the other cards. The book is almost finished - just as well as my deadline is 8th April - it just needs a few tweaks and faffy things. The cards are there in my head and partly on paper but still very much in the playing stage - the brief is men's cards, but I need to use some new to the market glitters. Glitter and men's cards aren't things you'd naturally throw together, but I like a challenge - or should that be I'm challenging?

As if that wasn't enough, I'm still working on the swatch book I mentioned. The pages will be added to over time, but I have so many pages already, that I'm in dire need of some sort of binding to contain them. Enter inspiration in the form of cardboard packaging - again, inspiration and cardboard packaging not normally closely bound but there it is. So I started ripping and peeling layers of cardboard and got more than a little carried away. After peeling the top layer off to expose the corrugation, I added manuscript paper, scuffed the edges and applied picket fence distress stain and inks. For texture I pasted rock candy distress crackle through a mesh stencil, inked into the cracks, then went in with some of my homemade texture paste and various shimmer mists.

I wanted to incorporate one of the art tiles I made the other week, to that I added die cut flowers inked with mists and a gilded flourish. I was all ready to pull it all together and whilst mulling over my title, I spied some crayons I'd bought for melting - the result was a 'rough' seal stamped with 'create' which led me on to melting ultra thick on a craft sheet over an iron and then stamping. My first attempt is ok, but then I decided to try adding coloured embossing powder. I love the way this one turned out.


The finished cover. It's evolved into much more than I initially intended, but I'm so pleased that I let myself go with the flow and experiment.
Now I really need some industrial strength cleaner to remove all the craftermath from my hands!


Monday 25 March 2013

When A Plan Comes Together

For the past week or so, I've been working on a techniques swatch book for myself and wanted to do some examples with texture paste. Not having any texture paste made my task difficult and the Range wanted me to part with £9.99 for a tub so I decided to attempt to make my own. Well, the family haven't heard the end of my 'for pennies' version, and why would they, it's fantastic!

I'd heard that you can use talc or cornflour to make texture paste but I wanted a rough grainy look, so I went with bicarb (baking soda) - I guess salt would work too and maybe seasalt would react interestingly with any ink. (mmmm something to try later I think) I mixed the bicarb with a little white acrylic paint and PVA then slapped it on through a tyre tread mask from That Special Touch. I oversprayed the dried paste with various inks and micas - in real life it looks very oil on water/muddy which was what I was going for.


UPDATE
Tried seasalt - very bad idea, but cornflour makes a really nice fine  paste.

Monday 18 March 2013

Like buses.....

.....you wait nine months then two come together!

As I mentioned yesterday, I wanted to try the art tiles with Crackle accents, and adding some postage stamps to the background. well I had a go and these are the results.
I'm not too impressed with the crackle ones - I think that the crackle medium took too long to dry and/or soaked in to the ink too much and muddied the background.


The next ones were more successful, even though the stamping has run on them. I think if I do some more, I'll try Stazon to keep the stamping sharper.


Sunday 17 March 2013

Hello Stranger

Blimey, I didn't realise it had been 9 months since my last post. It's not that I haven't been being creative, but a lot of what I have been doing is for Papercraft Essentials magazine, so I can't blog it. I've also been knitting rather a lot of socks and making mini albums - most of which remain almost, but not quite finished.

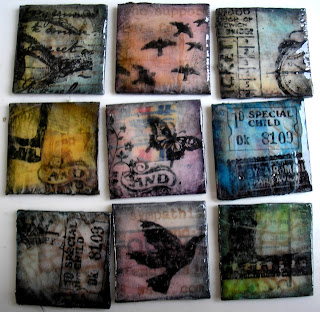
Anyway, the other day I was fatally sucked into youtube and came across this excellent tutorial for art tiles by Linda at livartnow and was inspired, as it seems were many others. I ended up making 12 at 1.5" and 22 at 1" and was so thrilled with the results that I'm now making some different shaped ones.

At first I thought my colours were too vivid, but once the Glossy Accents goes on, it all seems to merge and soften. On some of the new ones I'm working on. I'm going to try Crackle Accents and I've also added some scraps of old stamps to the background - we shall see how they turn out.

So, here are the first batch - please leave me a comment and let me know what you think.

The first three pics are the 1" ones, followed by the 1.5".